A pedicure doesn’t cost all that much; but still, it can add up over time, especially if you add in all the extras that they offer you at the salon that you often fall for. As a DIY project, a pedicure can be a very satisfying one. Not only will you end up saving quite a bit if you add it all up, you’ll end up getting one done far more often, and get compliments for your really pretty feet. As a foot care project, this will probably not need you to take out more than a half hour each time even if you follow all the steps. So make sure that you pamper your feet, and that you don’t skip any steps.
Any foot care project starts with a great foot soak. The thing is, this does more than to just soften the dead skin on your feet and get you ready for a pedicure, there a few things on earth that can get you feeling this happy this easily. Prepare a foot bath with warm water; to get rid of any malodorous bacteria, put in a spoon of tea tree oil; a bit of a witch hazel should help clear out your pores, and a measure of Epsom salts should help you get your feet feeling clean. And it couldn’t hurt to throw in a bit of peppermint to get your feet feeling all tingly. If all of this seems like a lot, they sell packaged foot soak bags at any skin care outlet.
Once you’ve soaked your feet for a good ten minutes, your next step on would be to scrub off all the dead skin that the soak has loosened up. But you don’t believe that you need to get any special exfoliants off-the-shelf do you? You just need sugar, and perhaps a little almond oil to smooth the action. If you do wish to go buy ready-made though, that’s a way to go too. Whichever product you choose, begin at the tough skin around your heels, and scrub all the way up to your toes with a gentle circular action. Make sure you cover your entire foot and go all the way up to your calves.
Any foot care you need done will require a pumice stone to help you grind down any tough spots like calluses. Coat the area you wish to work on with a little shower gel, and get to work with the stone. Remember that you’re not trying to get your skin raw – be gentle with the stone, remembering that you only need to get rid of the dead skin, not the live stuff. Use a gentle to-and-fro motion to scrape all the right places off.
For the next step, which would be to take care of the toenails, I especially like the affordable-and-yet-high -quality Sally Hansen LaCross Comfort Curve toenail clippers that you can get at any drugstore for a couple of dollars. The first cut can be somewhat angular; and you can around your nails out beautifully with a nice glass nail file after that. Make sure that you get them nicely shaped so that there are no issues with ingrown nails later on. That should break the back of the project; to seal in all the freshness, use a nice pampering foot treatment cream, and massage it in taking your time. The massage helps with the circulation, and gets you feeling really like you are walking on air.
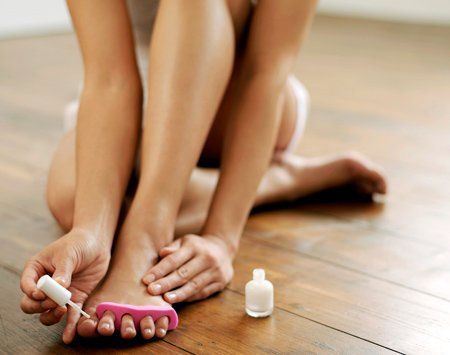
A final coat of polish should get you really ready for the dance floor. Used a nail polish remover that doesn’t contain acetone, to clean off any of the lotion from your massage. Once you’ve got your toes nicely sticking out and held apart with toe separators, use a protein formula base coat to help strengthen your nails. The colors in vogue this year are real bright ones – pink, orange, you get the idea. Your nail painting action should typically start at the cuticle and sweep up towards the tip. Once you’re done and nearly dry, round out your foot care program with a little cuticle oil to help keep things glossy.


